When you decide to start online teaching, choosing a videoconferencing platform (e.g. Skype) might seem daunting at first, especially if you are not at all tech-savvy. Your might think: ”I am already good at face-to-face teaching. Will I be able to apply my skills to teaching through any online platform?” This is understandable – no one who has already built their teaching career wants to go back to feeling like a beginner. To help you overcome this fear, I have prepared a guide on how to choose the right videoconferencing tool and how to use it in a way that allows your students to benefit from your teaching skills.
Disclaimer: this post will be most useful for those who are just starting to teach online.
What’s videoconferencing?
Maybe you are not familiar with the word, but I am sure you are already using some videoconferencing software. It is a platform which allows you to meet online with one or more people (think of Skype, Facetime, Google Hangouts). Its most important features for online teaching are:
- You and your student can see each other through the camera
- You can exchange files, links, images, videos
- You can engage in textual chat
- You can share your screens
- You can take control of their computer (for the purpose of demonstration, nothing to do with hacking!)
This simple overview of what you can do while videoconferencing shows how you can create the same teaching environment you’d normally do in your f2f classes (with one exception: those teachers who work best when moving around the classroom might feel somewhat constrained in an online class, but I will write about how to overcome that in another post).
What’s there?
Skype. The biggest advantage of using Skype for your online classes is that most people are already familiar with it and don’t need to go through the installation process. It might sound trivial, but this is a considerable advantage especially when your student is not a tech-savvy person and it took you already a lot to convince them to go out of their comfort zone and try doing an online class with you. “At least I know Skype”, they might think, “and it’s easy to use so I might give this Skype class a try”. At the same time, however, if your students mainly associate Skype with catching up with friends and family, having classes on it might feel slightly unprofessional to them. However, this does not mean that Skype per se is unprofessional – on the contrary, it is still one of the most widely used videoconferencing tools in the business world. It’s just that some students might not be aware of that and you will need to fix that by the time of your first class.
One drawback of Skype’s free version is that it doesn’t have an integrated recording feature so you will need to use some third-party Skype-recording software (such as Pamela) if you want to record your classes (for which there are many good reasons, but more about that in the following posts). You could use a screencasting solutions such as Screencast-o-matic, but you’ll find that the free versions typically limit the time you can spend recording. Nevertheless, if you decide Skype is the best option for your classes, you can also upgrade it to a packet which costs just 2$ per month and unlock meeting recording and many other options. With the free version, you can host a meeting for up to 25 participants, which should be more than enough for a private class.
Zoom. This videoconferencing platform definitely has a more professional feeling to it. It allows you to create virtual meeting rooms which your students can enter by clicking on a link you send them (if they don’t already have Zoom, the download will start automatically). Once in the meeting, you can do pretty much the same things you can do in Skype: share your screen, chat, send files. A big difference is that Zoom has an integrated meeting recorder, unlike Skype. In addition, the video and sound quality seem to be slightly higher on Zoom than on Skype. Also, on Zoom, you can host up to 50 participants and it has a webinar feature (which is useful in general but it might not be relevant for your private class).
Overall, it is my opinion that Zoom beats free Skype when it comes to the functionalities it offers. However, this does not automatically mean it is a better solution for your classes. The reasons for this is that: 1) Zoom fits the corporate setting much better than the online class setting and 2) there is a high probability your students will not be familiar with it. Both may negatively affect the user experience for some students.
For a more detailed comparison, check out this FinancesOnline review.
Google Hangouts. There is no significant difference between Google Hangouts and Skype/Zoom besides perhaps the fact that Google Hangouts is the easiest to access from Gmail communication which may be useful if you are in touch with your students over email and you need to quickly start a video call with them. Like free Skype, Google Hangouts can host up to 25 people in a group call. I have never had a class over Google Hangouts, but I have used all its features in personal communication and since I did not notice any advantages over Skype/Zoom, I would not recommend switching from a more familial platform to the generally less used Google Hangouts (unless you find it better for some reason, in which case please let us know!).
Appear.in. Recently, I gave an interview through Appear.in. My host Bret from Oetjobs invited me to join him through a link, I clicked on it and that was it. I did not need to download nor install anything. The experience was so smooth and effortless that I wondered if it would work as a platform for online classes. It seems that it would, since it has all the features you’d need: the audio-video is there, it has an integrated chat, you can share your screen. Its biggest advantage is that it feels extremely lightweight – your more technophobic students would certainly appreciate this as the process is completely “painless”. On the other side, it does limit meeting participation to only 12 people, but again for most classes that should be more than enough.
WizIQ. Out of all the platforms described in this post, WizIQ is the only one whose original purpose is educational. It’s intended for online educators just like yourself and it seems it was tailored to mimic the traditional classroom experience. Besides its videoconferencing feature, it has an integrated whiteboard and some useful learner management features such as the possibility to integrate polls, assessment activities, forums, and similar. You can create a gateway through which your students can pay for their classes so you can easily build a course-like structure and even schedule your classes through the platform. To top it off, you can even apply some white-labelling and put your business logo on your course. All in all, it is a much more comprehensive platform than the other ones when it comes to creating a virtual classroom, but it comes with a price. Currently (March 2018) it starts at 27$ per month and goes up to 68$ per month.
Some other videoconferencing platforms worth mentioning are join.me (for which there’s an official consensus it is most suitable for team presentations), GoToMeeting and Screenhero.
Now that you’ve seen what’s there, it is up to you to decide which platform best suits your and your learners’ needs. As I said before, there is no straightforward answer to the question how to choose the right videoconferencing tool for your online class. Nevertheless, if I had to give the simplest possible answer it would be by applying this step-wise approach:
- Decide on your budget (or whether you want to invest in videoconferencing at all)
- Think what makes your online class: types of interactions you want to engage the student in, number of students, the tools you will be using the most. etc.
- Identify the platforms that match your budget and your class type
- Ask the student(s) to make the final decision.
If your student is not comfortable with any of your options, ask for a chance to demonstrate why you think one of those platforms would be ideal for your class (the most effective demonstration comes in form of a free class). However, if after the demonstration they are still reluctant, you will need to go with whatever they prefer.
How to use a videoconferencing tool in your online class?
If you decide to invest in a platform such as WizIQ, you will see that its feature and interface are adapted to its pedagogical purpose so you will probably find it intuitive to use. However, with videoconferencing platforms that are not originally designed for teaching, you might not see all the possibilities straightaway and you will find it necessary to combine the platform with a few more tools in order to have an engaging, interactive online class.
Let’s start from the basics:
- Use the camera. It might seem like an obvious one, but I know for certain that there are students and teachers who prefer not to show their face. There’s nothing wrong with that – after all, first distance classes were successfully delivered over the telephone decades ago. However, seeing each other’s non-verbal cues will help you build the rapport with the student, so make it a rule of your class that camera must be used.
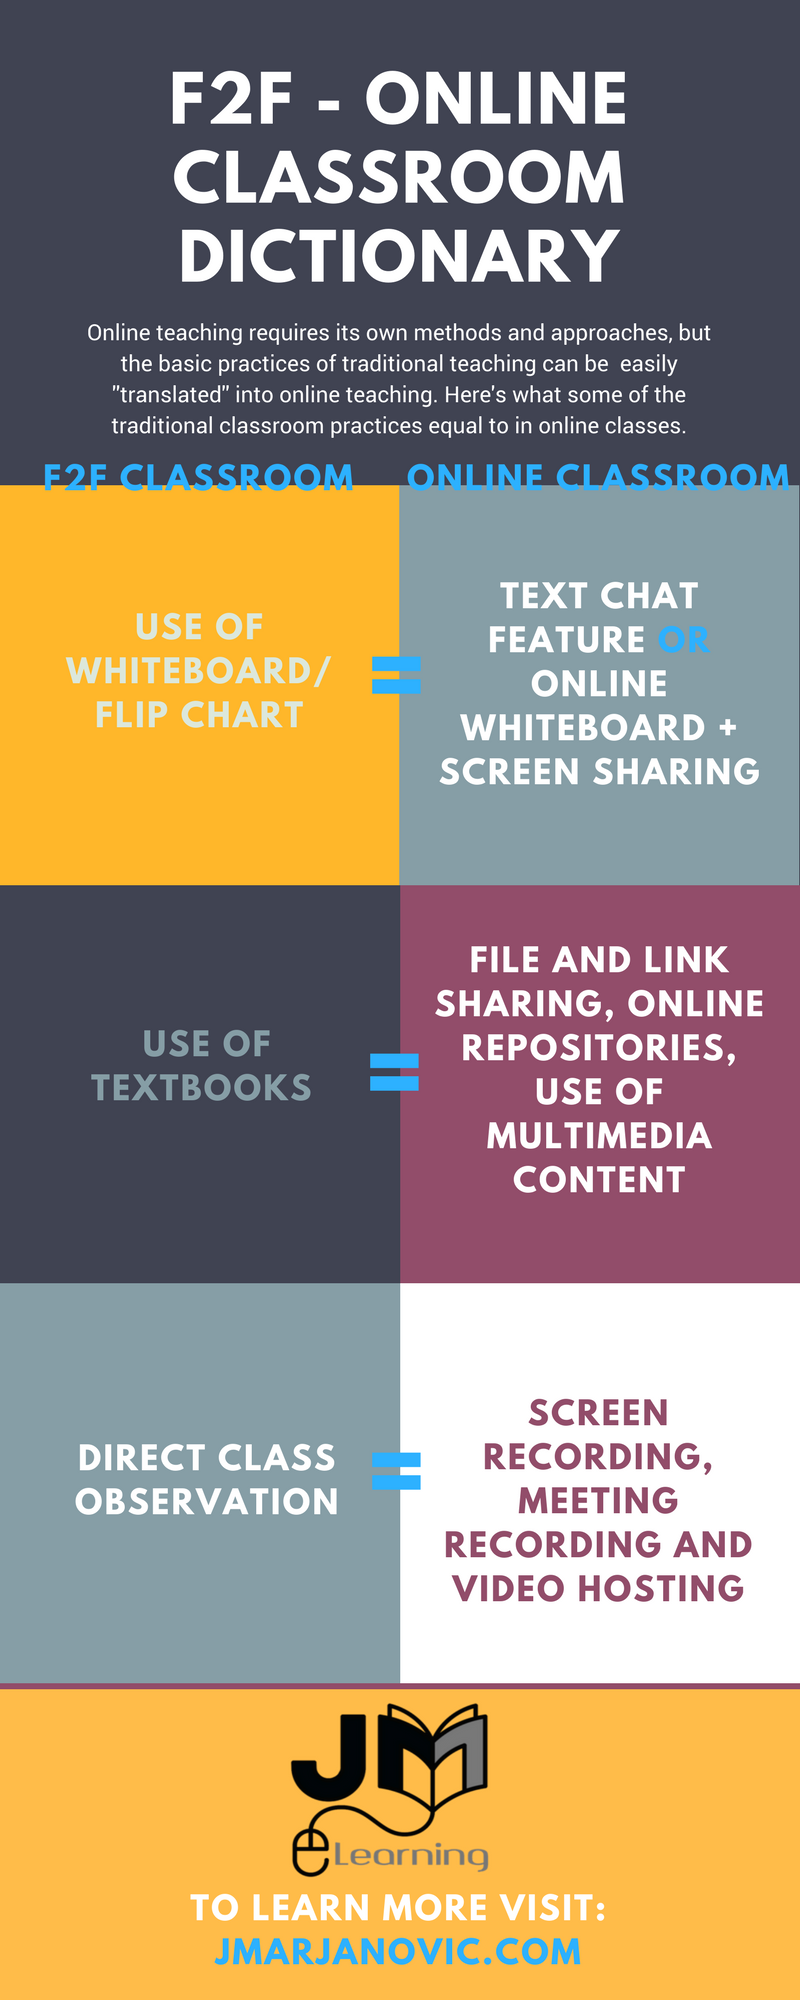
- Use the chat feature. This will be your whiteboard most of the times. Don’t forget to encourage your student to use it as well. In the traditional classroom, teachers would call out a student to write something on the board. I remember being on both ends of that situation and as a student I felt powerful because I got the “authority to use my teacher’s territory” (the white board). With chat I’d be surprised to see this empowerment effect as it is a feature that your students probably already heavily use in their everyday life. Still, using the chat feature will increase student engagement, in a foreign language class it will help practice their spelling and finally it will give them an opportunity to interact with you in more than one mode, which is important as multimodality helps cater for various learning styles and needs.
- Share files and links. Hopefully you will be using as many communication modes as possible in your classes and you will have prepared a lot of different media contents to share with your students. Needless to say, sending preparation and homework files to students through the same platform you are meeting on has a logistic advantage. But also, take advantage of file and link sharing during the class too. For example, if you want to illustrate or exemplify something to your student, you can quickly look it up on the Internet and send them the link. Why would you waste time on describing a picture, website, some video clip etc. if you can instantly demonstrate what you’re referring to? And vice versa, encourage your students to share the link to that movie they saw or that cool app they have come across. I know this goes without saying for most of you, but still it needs to be emphasised as many teachers under-use this affordance for learning. Also, how many times has a student asked you a question you did not know the right answer to? It has happened so many times to me (thankfully I’ve had some very diligent and brilliant students)! Instead of saying I don’t know and leaving it there (which is by the way still much better than giving an answer you’re not sure about) I’d quickly google the answer and send the relevant screenshot to the student. You can ask the students to google it out too, but it is more efficient if you do it because probably you will know where exactly to look and what answer to take as credible.
- Share your screen. Obviously, use this feature when demonstrating something. I have also used it as a time saving method in situations when I need to quickly confirm my student and I are on the same page or when the student for some technical reason cannot open a page or a file they are supposed to use (this happens a lot more than you’d think). One of the most engaging uses is to watch a video clip/movie together.
- Ask the students to share their screen. You will mostly use this option when you want your student to complete an activity (e.g. an online grammar exercise or a quiz) so you can support them in the process. Also, it’s good to use when you want to quickly check if an activity or a resource displays well on the student’s end. It has happened to me to create great lessons through apps such as wizer.me but then I’d realise something was wrong when the student played them and the most efficient way to fix the problem was to see the student’s screen directly.
- Take/give control over the device. Some platforms such as Skype for Business allow this option. You will probably need to take control over your student’s device much more than give control over yours. This can be necessary when the student is stuck on a page for technical or other reasons and you know you will fix the problem much faster than they will. However, I do not recommend overusing this option as it can feel intrusive for the student.
- Use the gallery and chat backup. Do this in orderto quickly access shared files and keep a track of what’s done. You may also want to encourage your students to write their notes directly in the chat during the class and save them together with your chat interaction so they can have it all in one place.
- Add someone to your conversation. Use the group call option not only to give group classes but also to occasionally engage your 1-on-1 students with each other. It will keep the class more interesting and you help your students build a learning network.
- Record your classes occasionally. For self-reflection purposes mostly, but also do this to ask for feedback from other experienced online teachers. In addition, you can give the recording to your student for them to analyse how they performed in an activity or to help them track their progress. Just remember to ask your students for permission before starting to record.
Bonus: some useful combinations
- Combine screen-sharing with interactive virtual whiteboard (e.g. https://awwapp.com/): if you don’t want to use chat, or want to draw something or you just want to have the experience of the authentic whiteboard.
- Combine screen-sharing with a collaborative tool (e.g. Padlet or Trello): have two or more students work together in a collaborative app and let one of the participants share their screen so you can monitor what they are doing and give your feedback.